Thursday, 12 February 2009

A sketch for you...

Well, I have another sketch for you today, so if you feel the need for a bit of inspiration, maybe this sketch will jump-start your mojo. Don't forget to upload your layouts in the gallery, we would love to see your interpretations.

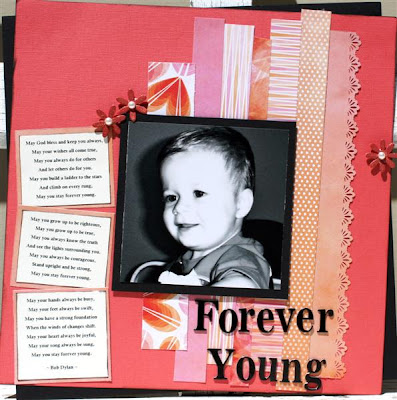
And, here is my interpretation using the gorgeous Crate Paper Mia collection. Happy scrapping, bye for now. Lynlee.


Wednesday, 11 February 2009

Bushfire Appeal!

Country Papercraft is doing their bit in raising funds for the Bushfire Appeals.

Next Weekend 20th - 24th of February we are holding a CYBER SCRAP-a-THON over in the FORUM

There are going to be challenges with prize packs, and 10% of all sales on the SATURDAY will be given to the Bushfire Appeal! So why not spend up big, increase your scrap stash and give money to the Bushfire Appeal.


How about getting some of your non scrapping friends to sponsor you on how many layouts you will create over the weekend? The more layouts you get done - the more money you raise for this worthwhile cause!

Sponsorship forms are available for download by sending an email to me.

Monday, 9 February 2009

Anyone up for a bit of Blind Scrapping??

Thought I might have a go at providing you all with a blind scrapping challenge, so go forth and gather your supplies :)

You will need: 1 x cardstock for the base
1 x patterned paper 18.5cm x 17cm
1 x patterned paper 4.5cm x 26.5cm
1 x patterned paper 30cm x 9.5cm - I scalloped the bottom edge, but you could tear it.
1 x ribbon or lace 17cm long
1 x photo - mine is 10cm x 11cm
Chipboard, sticker or rub on alphas for title
Tiny alphas for sub title
Blossoms, chipboard shapes, bling for embellishing.

Ok, here goes:

Distress and/or ink the edges of your patterned paper.

Take the 30cm x 9.5cm piece of pp and place along the bottom edge of the cardstock. Mine is about 2cm up from the bottom with the scallops facing down.

Next, take the 4.5cm x 26.5cm strip of pp and place down the left hand side. Mine is about 2.5cm from the left edge and overhangs the bottom piece slightly.

Place the 3rd piece of pp over the strip and bottom pieces. Mine is about 4.5cm in from the left edge and about 6cm down from the top.

Are you still with me??

Now place your photo on the 3rd piece of pp. Because mine is almost square, it fits nicely, and I placed it about 6.5cm from the left edge and about 10.5cm up from the bottom.

Place the piece of ribbon or lace along the bottom of the 3rd piece of pp, up about 1cm and extending onto the scalloped strip.

There you go - nice and easy, and hopefully understandable.

Place your title on the right hand side of the pic, with your sub title under the ribbon or lace strip, and place your other embellishments to make the lo your own.

Mine will be shown in the CPC February Mid Month newsletter.

Please upload yours into the Gallery , and I will choose one to show here on the blog :)

So, what are you waiting for??? Dont forget to share - I will :)

Thanks for taking my blind challenge

Deb (aka TD)

Friday, 6 February 2009

This week's Scrapbooking Sketch

The very talented Deb has drawn us another sketch!!!!
Would love to see your interpretation of this gorgeous sketch!
This fantastic page was done by Kris, I saw it in the gallery and wanted to share it with you all.
She has used Deb's Sketch and the February Designer Kit...Love it Kris.

Thursday, 5 February 2009

Monday, 2 February 2009

Spied in the Gallery

Whilst scouring through the recently uploaded layouts in the gallery today, I came across this layout...


POISED - created by Bramblebabe....

I love the muted tones, the addition of the driftwood from the beach, all the beads & fibres. The paper rolling technique used is absolutely gorgeous too. What an all-round awesome layout!

Who's going to be our next featured artist? Keep your eye on the blog for the next layout that catches our eye soon!

Saturday, 31 January 2009

Feb Kit step by step and sketch

Hi....do you like the new kit?? Do you love the idea of the add on kit?? i know I do!
It gives you so much more to play with and to help make your LO's 'pop'.

I have created a step by step for you using this gorgeous kit and add-on.
I have also created my own sketch as well. i hope you like it.
Here goes.......

Step one.
Using the threaded water punch (available from the shop) create a scalloped edge down the side of the ‘Sugar Cookie’ paper. You then need to trim this strip so that it is 23cms long. If you don’t have this punch use a different one or create your own scalloped edge. I have also gone along and punched another hole in between the other holes. Here is a photo to show you what I mean. Sorry for the terrible picture!!


Step two.
Using the same paper cut a strip 2cms wide x 28cms long You need to them glue both pieces to the white cardstock. I have done it so the scallop is pink and the strip orange. The pink strip is 2.5cms from left hand side and the orange butts up against the pink, making sure equal amounts top and bottom.Step three.
Using the butterscotch paper cut a strip 10cms wide by 25cms long. Glue this piece down (hearts side up) so that it slightly overlaps the orange and again equal amounts top and bottom.


Step four.
Using the Raspberry Cream paper cut a piece 11cms x 15cms. Glue this down (pinky side up) so that it overlaps the last piece by about 3cms and is about 2 cms lower down the page. See the photo if I am confusing you! LOL.


Step five.
Again using the raspberry cream paper cut a strip 4cms wide by 15cms wide. Stick it down (striped side up) running horizontally and butting up against the last piece you stuck down. Again see photo.


Step six.
Now its time to stick your photo on. In my sketch I have drawn it for one photo, but in my example I have used two. Use as many as you want.


Step seven.
Now you need to stick on your title.


Step eight.
Now embellish and make it your own!!!
The first photo shows the Lo using the kit.
The second photo shows the LO using the kit and the add-on kit.

.

February Newsletter is on its way to your inbox!

It's HERE! The big Kit news!!!! This year for something a little extra we have created the ADD-ON KIT!!!! A bag full of embellishments to add to the Monthly Designer Kit! All those little bit extras that you sometimes feel you need to add to your pages!
Well now it's happened!

So for an extra $10 you can purchase the Monthly Add-on Kit - that is jam packed with embellishments up to $15 - $20 value!!!!


February's Add-on Kit Features:

Jenni Bowlin Kiss Bingo Card
KAISERcraft Black Rhinestones
Bazzill Black velvet flowers
KAISERcraft Clear stamp
Green Tara Hot pink and white blossoms
Bella-Hot pink Bling brads
Heidi Swapp- chipboard shapes
Black embroidery thread
White/silver tag
Silver diamond shaped studs


This month's kit is bright, fun, and romantic all mixed together, which makes it perfect for all those Valentine's Day layouts, coming up in the next couple of weeks.

This kit features:


KAISERscrapbooking Sweets patterned papers:
- Butterscotch
- Sugar Cookie
- Creme Caramel
- Raspberry Cream

Bazzill Cardstock
- Hot pink
- White
- Orange

Heidi Swapp - Newsprint Glossy Black chipboard alphabet
Adorn it - Carolee's Creations- Tiny etched natural alphabet stickers
Hambly Screenprints - Black transparency frame
KAISERcraft Pearls - Pearl
Queen & Co - Hot pink Felt Fusion
Green Tara Black blossoms

Check out the Designer's Gallery to see what the Designer's have created with this month's kit!

This week's Sketch...

This week's sketch is created by Mish.


Perfect for lots of holiday snaps.
Mish has used KAISERscrapbook's fun in the sun papers, Green Tara blossoms, Tim Holtz Grungeboard and Versacube Ink.

Look forward to seeing your creations in the gallery

And the WINNER is........

as drawn by Will and Georgia(very excited they were...lol),  KRIS....woo, hoo, well done Kris, you've won $10 off your next order at Country Papercraft, just put it in the comment section of your order Kris and it's your. Thanks ladies for your great comments, and stay tuned for the newsletter and kit reveal, which will be in your inboxes very soon. Have a great weekend. 

Friday, 30 January 2009

A final Sneak....


Ok.....this is your last sneak at the luscious February Designer kit, before the big reveal tomorrow, and, it's also your last chance today to leave a comment here to be in the running to win a $10 voucher to spend in the shop. We will draw a random winner tomorrow and post the winner on the blog, so enjoy the rest of your Friday, and get ready for the February Newsletter and Kit release tomorrow :)

Thursday, 29 January 2009

More Products added to the shelves!

Time for another update on what's new instore

Hero Arts Clear Stamps - Anytime Messages, Frames & Messages, Treasure the Moments


Adorn-IT Clear Stamps - Birthday Bash

Glimmermist - Dew Drop, English Ivy, Garden Fairy

Heidi Swapp Clear Extras - a diecut sheet of Heidi's Ghost shapes - new product from Heidi!

Heidi Swapp Edge Distresser.

Not long now until the Feb Designer Kit is released - and the BIG announcement!

Don't forget to post a comment to be in the running for a voucher!

And here's some MORE......

Well we are back with yet another sneak peak at the fabbo February Designer kit, have you spotted any clues yet??? They are there trust me....lol. Don't forget to leave a comment and you could be in the running to win a $10 voucher to spend in the shop, have a great Thursday, and make sure you check in tomorrow for another peak. 


Wednesday, 28 January 2009

Another sneak...

Well here we go with another little sneak peak at the yummy February Designer kit, so how is it looking so far? Tell us what you think by leaving a comment here, and one lucky person will win a $10 voucher to use in CPC store, so get typing girls, and we will announce the winner here on the blog on Saturday. Have a great day, and see you back here tomorrow for another sneak at the kit, and maybe a clue ;)


Tuesday, 27 January 2009

Extra, extra...

....we thought we would give you a few sneak peaks of the gorgeous February Designer kit over the next few days, and maybe just a few little hints as to what we are up to with the kits come February 1st, so keep checking in to catch a few more glimpses. See you tomorrow.

Scrapbooking Sketch No 4 - TD

Deb (AKA TD)has created this fabbo sketch for you all.

Saturday, 24 January 2009

Darkroom Door and so much more!


Darkroom Door's ranges of stamps and patterned papers have hit the shelves at CPC.

These are a great range of vintage type papers and stamps and well worth getting hold of!

Also added over the past couple of weeks are:

Clip it up Combos - great storage for those rub-ons, stickers and the like.

Heidi Swapp Foam Stamps - Spooks, Dots, Exclamation, Hibiscus

See D's Stamp Sets - Arrows, Baby, Bella Flora, Birthday, Fresh Upper & Lowercase, More Borders, Sharie's alphabet, Stars, Wedding

Stampendious Clear Stamps - Butterfly Beauties, Silhouette Songbirds

Technique Tuesday Clear Stamps - Dog & Pony show, Rocket Man

Inkadinkado Clear Stamps - Floral Flourishes, Beautiful Fairies

Rusty Pickle Acrylic Stamps - Chocolate Kisses, Pirate Princess

Hero Arts Stamps - Calendar, Birthday Messages, Brackets & Swirls, Long Bracket Messages


Darkroom Door Papers - Legato, Robots, Robot Journals, Music Gazette

Darkroom Door Wordstrips - Venetian, Music

Darkroom Door Photobooth - Ladies

Fiskars border & Corner Punch - Read between the Vines, Lattice Entertain You, Leave it to Weaver, Sunburst, Coming up Roses, Hearts, Flowers, Greek Key, Embossing Scalloped Daisy, Icing on the Cake, A dozen Roses

Versamarker pens,

Versamark Dazzle - Frost, Champagne

Versacolour Cubes - Canary

Foam Dots & Squares

Cuttlebug Storage Folders are back in stock - Hurry these sell out quickly!

Cuttlebug Storage Folder inserts

Fancy Pants Holiday Transparencies

Bella Chipz assorted chipboard flowers

Fiskar's soft touch scissors are back in stock

Brilliance White Ink pad & Refill

Acrylic Stamp block - for those long clear stamps

KAISERscrapbook Clear Stamps - Christmas Trees, Christmas, Friends are back in stock

KAISERcraft File Set

KAISERscrapbooking Brads - Sakura, Waterberry, What a Hoot, Military, Dancing Jewel, Distracted, Skull Girl, On the Dot, Skull Boi, Rustic Charm, Everblooming

KAISERscrapbook Papers - Military, Distracted, On the Dot, Skull Boi, Rustic Charm, Dancing Jewel, Argentella, LoveStruck

KAISERcraft Wooden Bookshelf, mini album

Basic Grey Rub-on Tool - back in stock

Carolee Creation's Alphabet Stickers - back in stock

Hambly Transparency Borders - back in stock

Wednesday, 21 January 2009

NEW Kaisercraft File Set.

Need a file set to add to your craft tool box? Stop your search - Kaisercraft's new File Set are perfect for distressing papers and smoothing the edges of Beyond-the-Page albums, and at great value - you can't go wrong!

Tuesday, 20 January 2009

Scrapbooking Sketch No 3. - Mish

Mish is away with her family, but before she went she created this sketch for you all.
On this layout Mish has used all the products from the fabbo January Kit, available at the shop.


Marg has used Mish's sketch to create this layout. She has used a transparency, some older papers from a kit along with Kaiser Rhinestone & PP and some Queen and Co. Felt.

Sunday, 18 January 2009

Hi I'm Julie and here is my
Step by Step project for you to have a go with.
"Precious moments layout. "
What you need:
3 sheets 12x12 pp
1 sheet of shaped pp ( for template only)
1 tag
1 journal block
20cm bit of ribbon
Some buttons/ bling
Flower
Assorted lettering
Ink
1 x 5x7 or 6x8 portrait pic.

Step 1

Using the template sheet trace around and cut out on 1 sheet of pp. Ink all edges.

2. ink edges of backing pp and stick shaped pp ontop.
3 & 4. cut a piece of pp the same size of your pic – so if your pic is 5x7 then cut a piece 5x7 - if your pic is 6x8 then cut a piece 6x8. Ink edges and stick down landscape across your page.
Stick down your pic – i have stuck mine down about 1” up from the edge of the pp.


5. choose your title – I have placed my title over the photo to make it stand out more.


6. I have slipped a tag - inked - under the edge of the photo


.


7. add the ribbon under the photo. Then add the journal block ( I have added a quote to my journal block) and a flower or 2, a flourish and some buttons or bling.


All done!!! Hope you enjoyed it!

Bye for now.

Wednesday, 14 January 2009

NEW Darkroom Door Stamps and Papers

Now in-store some of the awesome Darkroom Door Stamps and Papers.

Each tin includes one unmounted red rubber sheet suitable for card making, scrapbooking, paper craft, mixed media, collage and many other applications. Rubber stamps are known for their durability and retain the highest image detail with our photographic designs.
Size: 185mm x 130mm (7.3" x 5.1")
Directions for use:1. Adhere full red rubber sheet to EZ Mount foam (sold separately).2. Trim stamps individually using Tim Holtz Tonic Scissors.3. Place stamp onto clear Stamping Block - now you're ready for stamping!4. Store stamps in the metal tin provided.

Tuesday, 13 January 2009

Scrapbook Sketch No 2

Deb has created this sketch for you all to have a go with.

Here is the example of Deb's sketch using the fabulous Crate Papers Prudence collection pp's, along with SEI and Carolees alpha stickers - all available from CPC.
She used both DM and Kindy Glitz for definition on the lo.

Sunday, 11 January 2009

Celebrate Card

This ia a Card that Marg made for a friend's birthday.

She has used Kaiser Vagabond Papers and Brads with Bazzill blossoms.
A great card for any occasion.

Thursday, 8 January 2009

Fiskars Border Punches

We have just expanded our range of Fiskars Border Punches to include the Fiskars Corner and Border Punches. Takes the guess work out of creating corners.
Check them out in the Shop.
Also have restocked the very popular Fiskars Threading Water Border Punch, this does a scalloped edge with a punched hole in the scallop.
Of all the punches this one is great to use with cardstock as well as Patterned Paper.

Tuesday, 6 January 2009

Scrapbook Sketches

We thought we would kick the year off with something new.


Each week we will be posting a Scrapbook Sketch for you to have a go at.
Sketch No 1 for 2009 is from Marg.
(First Sketch she has ever done)
Hope you like it.

Here is an example that Marg has done using the sketch.


She has used Bazzill cardstock, the red has been run through the Cuttlebug using the Spots and Dots Embossing Folder.

Also some Deluxe Design Chronicles Romance Collage paper, which can be found in the Patterned Paper - Olde World section in The Shop.

The other paper is an older BG Black Tie paper, no longer available, from her stash.

The stamping was done with MM Magnetic Stamps.

The little letters are Carolee's Creations Tiny Alphabet Stickers.

All available from Country Papercraft.


Would you like to use our sketches? Please email us a 100kb or less image of your sketch and permission to publish your sketch on our blog.

Share your sketch interpretations with us in our GALLERY.

Monday, 5 January 2009

NEW INSTORE....

The Beloved CUTTLEBUGS are back in Stock.... HURRY THESE SELL OUT FAST!!!!

Bella Chipz Chipboard Alphas - in blue, black, pink, purple & white

Dreamstreet Chipboard Alphabet (was featured in Jan 08 Designer Kit)

Heidi Swapp Ghost Alphas - these are making a resurgence - they look excellent when run through the CUTTLEBUG embossing folders.

Xyron Large Sticky Dots

Glue Dots - mini, pop-up & craft dots - these would have to be some of the best dots around!!!! I love using the mini dots for chipboard alphas & and they are almost invisible under transparencies. The pop-up dots are FANTABULOUS for layering your blossoms or embellishments!

Print Blocks 3 ring Binders - Black, Red, Lime Green

Print Block post bound Albums - Hot Pink, Lime Green, Red Hot, Sky Blue

Check out all the new arrivals HERE