Tuesday, 30 March 2010
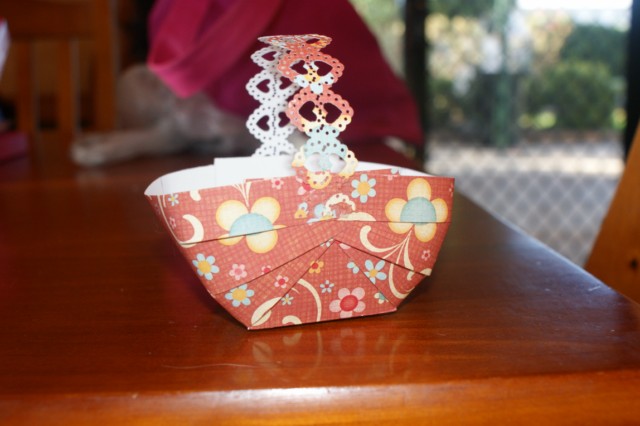
Easter basket tutorial
Sunday, 28 March 2010
WEEKEND CHALLENGE - REMINDER (and my LO finally...LOL!)
Just reminding everyone that you have until tonight to upload your page for this weekends challenge!.
You can link back from your blog to this post, or upload direct to the Weekend Challenge gallery here: March Weekend Challenge Gallery
Here is the challenge:
I'd like to see some recycling! Use at least four different types of recycled items on your creation - ie if you just use one piece of cardboard and make four new things out of it, it will only count as one item type recycled. So you need to dive into all different manner of things to use! Look for recyclable products like paper or fabric or plastic or cardboard or "notion" style (ie ribbon, button etc) or metal (the foil from milo tins etc) - the possibilites are endless! Tell us what each item was originally and how you have used it in your creation!
To clarify, as long as you are using at least four different sources of items on your page, you can use them however you like (ie making something new, or just using a piece on there). SO you can have more than one paper item - ie an envelope and a paper bag, or more than one cardboard item - ie a piece of pizza box and the backing board from a PP pack. Etc. Basically the more pieces you recycle the better!
Here is my page finally:
Hope you play along.
So go check out the last CPC newsletter here, and show us what you make, either by linking here to the blog or loading to the gallery. Be sure to include the words March Designer Challenge on your Layout in the gallery though to make it easier to find you!
Your name will be added to the draw for each challenge you complete from the newsletter (ie one challenge done = one entry, 3 challenges done = 3 entries).
YAY - hope you play along, I can't wait to see what you make.
Lee :)
Friday, 26 March 2010
Let's Reuse, Reduce and Recycle - Weekend Challenge
So quoting Lee:
I'd like to see some recycling! Use at least four different types of recycled items on your creation - ie if you just use one piece of cardboard and make four new things out of it, it will only count as one item type recycled. So you need to dive into all different manner of things to use! Look for recyclable products like paper or fabric or plastic or cardboard or "notion" style (ie ribbon, button etc) or metal (the foil from milo tins etc) - the possibilites are endless! Tell us what each item was originally and how you have used it in your creation!
Don't forget to post your layout in the gallery or link back to this post from your blog to show us you stuff. You could be the winner of the monthly prize draw for those who complete the Challenges.
Friday, 19 March 2010
10, 9, 8, 7....
This time it's Marg's turn to post - but as she has no computer or internet since a big electrical storm went through at the beginning of the week - I am posting her challenge for you.
Marg would like you to create a "countdown" layout!
WHAT?
Create a layout using
10 of one item - eg blossoms
9 of the next item - eg brads
8 of the next item - eg patterned paper
and so on and so forth..
D0n't forget to share or link back to be in the running for the monthly prize draw!
Tuesday, 16 March 2010
March Mid Monthly Newsletter
Check out all the Designer's layouts and catch up with new challenges and prize offerings
HERE
Friday, 12 March 2010
Weekend Challenge
It's my turn to set the weekend challenge this week...
So my challenge to you is:
That you scrap 1 photo 2 ways.
So what this means is that you take the same photo
and scrap it two different ways.
IE: Different products
Focus on Different parts in the photo
My Examples are:

In this first layout I have focused on how alike - yet different my boys are.
The second layout focus on them growing up so fast. I managed to snap this photo whilst they were sitting on the jetty in the Marina on holidays so I have used the lyrics from Sitting on the Dock .Looking forward to seeing what you come up with!
Don't forget to post in the gallery or link back to this post with your layouts.
Wednesday, 10 March 2010
Barracks work update!
Neil and I have been flat out...him more than me, bless him, we don't feel like we have done much but have been at it for weeks.
It is always the way, the preparation takes the longest.
We have most of the damaged boards replaced, just a few more to do....have the insulation ready to put in, the gyprock, hopefully getting started in the next week or so.
They have all been wired, the aircons are in the shearing shed ready to be fitted.
I have bought all the linen, have been checking out beds etc.
Take care,
Marg.
Sunday, 7 March 2010
Designer Challenge 7/3 - Handwritten Journaling
I am doing this weeks challenge, and it is a nice easy one for you all.
I'd like to see some handwritten journaling on your creation please!
Here is what I made, my journaling was written on a Collage Press diecut label, from the Joyride range.
Other supplies used are:
PP's:
Sassafrass Lass - Serendipity Happy Place "Pot of Gold"(background), plus a strip of background used as the stripe section.
Sassafrass Lass - Jungle Bungle "Smooth sailing" (check)
Some of the fab new Kaiser - Made with Love "Baby Cakes"(yellow hearts).
Cardstock - Bazzil Kraft.
OTHER:
Alphas: Kaiser "Pina COlada" alpha stickers for Visiting, Cosmo Cricket subway rubons for the J & H, Making Memories Tiny Type for the rest of Jack and Helen.
Embellies: Crate Paper "Lillian" glitter die cut starburst, button, Collage Press diecut label "Joyride", Jenni Bowlin chip button, Basic Grey Nook & Pantry covered brad, BG plain brads, plus a chipboard flower, and some tiny shipping tags.
Please link back here to share what you make, and if you upload to the CPC gallery, please include the note Blog7/3 in your title so I can easily find your creations!
You can upload them to the blog challenge gallery here: CPC Blog Challenge Gallery
Have a brilliant week everyone,
Cheers,
Lee
Saturday, 6 March 2010
HOW DARE MARG GO TO THE AC/DC CONCERT!!!!
We Designers thought that we would make lots of work for her when she gets back on Monday...
SOOOOOO
To make work for Marg we have DISCOUNTED
* Basic Grey
* Fancy Pants
* We R
* Dream Street
* Jenni Bowlin
* Piggy Tails
* Paper Salon
* SEI
* GCD Studio
* Doodlebug
by
25%
From Today until SUNDAY 7, 2010!
SO DON'T MISS OUT!!!!
Invoices will be adjusted manually to allow for the discount (the checkout will show full price)
HURRY!!!! At this discounted price the Papers won't last long!
Friday, 5 March 2010
Weekend challenges
How about you put together a 12x12 layout - okay so far ... I'm sure it is.
BUT ... I want you to only use ONE piece of cardstock and ONE piece of patterned paper – any embellishments that you decide to use must be handmade from that one piece of cardstock and / or that one piece of patterned paper AND you must use more than one photo.
How's that ... nice and easy ... nothing difficult about it!
You may use paints, stamps, inks, glimmermists, punches, sewing [machine or handsewing – you can use embroidery thread for this challenge - I'm being nice] ... but no pre-made or bought embellishments for example., no lace, ribbons, bling etc.
Any questions ???
Here's my example layout.

Your layout should be uploaded into the gallery before midnight WA time on Sunday night. Or Link your layout in the comments section of this post!
Have fun creating.
Michelle
Monday, 1 March 2010
March Kits are for Sale today!
Add on Kit contains:Tan Fibre
Buttons
Blossoms
Check out the Designer's creations in this edition of the newsletter
Sunday, 28 February 2010
Mish's Sketch

This week it is my turn to post a sketch challenge on the blog...
I would like to see your sketch full of colour and fun! I am hoping that I can create a layout tomorrow - being a public holiday here in WA!
Please feel free to use this sketch, place a link in the comments section to your layout so we can all see...
****Edited to Add****
Well - I scrapped! The first time since December - but as I have used the March Designer Kit I will just show you a couple of snippets of my layout - You will have to wait until the Mid Monthly newsletter to see the reveal
Saturday, 27 February 2010
Friday, 26 February 2010
Thursday, 25 February 2010
Sunday, 21 February 2010
New challenge
It's a recipe challenge. Please select at least 3 items form the following list and use those items to create your masterpiece.
Please do not forget to show us your creations.
The Ingredients:
1. White background
2. String
3. 2 photos - smaller than 6x4
4. Distressing
5. Stamping
6. White space
As you can see from the example, I have actually used all 6 ingredients to create my layout (although the white background is hard to pick up).

The pp's are Kasier Q3 Shaken Not Stirred collection, and the small black and white alphas are also by Kaiser. Both of these products are available from CPC.
The string I have misted with Black Magic Glimmermist, and although this particular colour is not available at CPC, Marg does have 23 other colours you can chose from :)
I have also used the Black Magic on my stamp for the chippie letters, but applied a bit too much pressure on the 'scr' so they came out inked :(, but he 'eam' are fine.
I have distressed the edges of the pp's with my Heidi Swapp edge distresser whch you can pick up from CPC.
Hope you enjoy my recipe and I look forwatrd to seeing al the fabulous creations
Happy scrappin'
Deb xoxo
Monday, 8 February 2010
A new challenge ...
Choose at least 5 [five] of the following ingredients.
Colour combo – aqua/green/white
Paint or Glimmermist
Ink
Clocks
Flowers [at least 6 of them]
Ribbon
Lace
Pearls
Bling
Tags
My example is here ...
Two little girls ... I've used pics of two little girls on their first day of school ... a generation apart ... the photo on the left is my daughter on her first day of school and you guessed, the little girl on the right is me ...
What have I used :
Tim Holtz crackle paint – Broken China – I’ve painted over magic mesh, waited for paint to dry, removed mesh and placed it elsewhere on my layout
Magic mesh
Pinecone ink
Kindyglitz
Beutron buttons – shabby chic
Glimmermist
Carolees Creations – tiny alpha stickers
HS acetate ghost clocks
Prima mini roses
Kaisercraft pearls
MS doily lace edge punch
Adhesives : Express double sided tape and Papercraft mini circles, and glue dots
Don’t forget to check out the CPC shop – you can find all of these scrapping goodies and more.
And ... don’t be shy ... share your creations with us.
You can leave us a link or you might like to join us in the forum and pop your layout in the gallery.
Happy creating.
Signing off
Michelle [aka Mrs Frizz]
Friday, 5 February 2010
Valentine's Day
Want to whip up a card that really doesn’t take too long at all ?
Go on, you know you do!
Let me share.
You are going to need the following materials :
2 pieces of cardstock
1 piece of felt
Embroidery thread
Ink
Alphas
Adhesive [double sided tape]
Grab a piece of cardstock to use as your base, I have used pink.
I cut my base cardstock 9” long by 4 ½” deep. Score and fold in half.
Ink around all the edges.
Cut a piece of white cardstock 4” x 4” and ink around the edges ... simple really.
Grab a piece of felt, yep, good old crafting felt comes in handy [check out the huge variety of colours in the shop].
Cut out a heart shape – mine is approximately 3” in size – now you can either do this freehand or do what I did.
I jumped on the computer and opened ‘Word’ – opened my drawing tools and found the heart shape, sized and resized and printed it off on to normal paper, cut it out and then placed it on the back side of the felt, I drew around it and then cut it out. It truly didn't take that long, honest!
Once you have cut out your felt heart, put adhesive on the back of the heart, I used double sided tape and then you stick it down on white cardstock.
Now grab a paper piercer and make holes around the heart into the cardstock and pierce a hole into the felt heart as well, similar distances right around the heart ... make sense ... I’m sure it does.
Needle and thread, in my case, I dug into my sewing box and chose black embroidery thread and then I have stitched all the way around the heart using long stitches backwards and forwards.
Easiest way of doing this is stitching from the back to the front first through the pierced hole into the felt – you can’t always see the hole in the felt if you are stitching through the top to the bottom in the heart ... hope that doesn’t sound too confusing.
Use adhesive [double sided tape] on the back of the white cardstock and adhere to base cardstock, in my case the pink cardstock.
Grab some alphas, put on a greeting or title and voila ... you are done.
Hopefully you have a card that looks something like this.

Now that wasn't too hard ... be honest!
Don't forget to share.
Happy creating.
Signing off
Michelle [aka Mrs Frizz]
Wednesday, 3 February 2010
WELCOME TO THE TEAM
Welcome to Michelle F (Mrs Frizz) who has been guest designer for the past 3 months. Michelle now joins us full time as a Designer.
We also welcome Lee (LaLaLee) to the team! Lee's funky style of scrapping with add flair and flash to our newsletter features.
Welcome both ladies - we hope you enjoy being part of the team!
FEB DESIGNER KIT ---

Ready to suit all those 1st day of school photos.
Sunday, 31 January 2010
Saturday, 30 January 2010
Sneak Peak 3
Friday, 29 January 2010
Want another Feb Kit Sneak Peak???
Ok, then here it is
Stay tuned for more :)
Deb xoxo
Thursday, 28 January 2010
Sneak Peak time
Hmmm, interesting
I'll be back later today or tomorrow morning with some more
Have a scrap happy day
Deb xoxo
Sunday, 17 January 2010
Its Monday.....
It is my turn today, and I have a sketch for you all, as well as an example.
Here goes:

Friday, 15 January 2010
3 Day SALE on Cuttlebug Folders

Only apply to stock on hand, no rain checks, does not apply to pre-order folders.
We are making room for the new folders, once we have sold out of some of the older ones I will not be replacing them.
Invoice will show full price I will adjust prices when I pack the orders. Will be in touch for total owing.
Have a wonderful weekend.
Marg.
NEW Martha Stewart Crafts Punch - Corner/Border set - Double Loop

Wednesday, 6 January 2010
Card Techniques - How to make an easel card
>

Please note this diagram shows measurements for a four inch card but you can make it any size you want.
Tuesday, 5 January 2010
Tuesday's Sketch Challenge
Friday, 1 January 2010
January Designer Kit Release