
Saturday, 30 October 2010
Friday, 29 October 2010
Halloween is Here!!!!!!!!
Well almost!
I know we don't really do Halloween in Australia, but the last couple of years my kids have wanted to, and we're all up for any excuse to dress up! Mostly, that's what it's about for them...not the trick or treating as much (though if they knock on a door and someone offers them lollies, there is NO WAY they are walking away empty handed! lol!!)
So because I have some Halloween photos to scrap, I thought you might all like to play along.
You have 2 choices for this challenge.......
A) Scrap a Halloween themed layout; or
B) Scrap a layout using Halloween colours - ie. orange, green and black - but not necessarily about Halloween.
Here is my layout meeting the criteria for A: (Halloween Theme)

And this one is B), because it is Halloween colours but definitely not Halloween Theme!
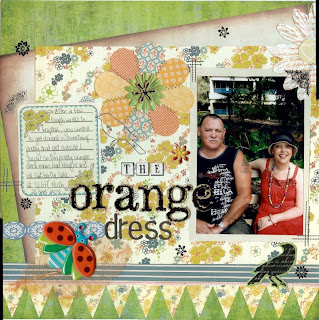 You can see I have included other colours in small amounts. Just so long as your layout is obviously orange, green and black, you can go into the monthly prize draw (no pressure.....the end of the month is hours away!!!) lol! Can you hear me cracking my witches whip??!?!?!!? (Insert evil laugh here...)
I know we don't really do Halloween in Australia, but the last couple of years my kids have wanted to, and we're all up for any excuse to dress up! Mostly, that's what it's about for them...not the trick or treating as much (though if they knock on a door and someone offers them lollies, there is NO WAY they are walking away empty handed! lol!!)
So because I have some Halloween photos to scrap, I thought you might all like to play along.
You have 2 choices for this challenge.......
A) Scrap a Halloween themed layout; or
B) Scrap a layout using Halloween colours - ie. orange, green and black - but not necessarily about Halloween.
Here is my layout meeting the criteria for A: (Halloween Theme)

And this one is B), because it is Halloween colours but definitely not Halloween Theme!


Thursday, 28 October 2010
Thursday's Challenge....

This week - I have a simple challenge for you...
You must use this colour combination, 5 embellishments, 2 photos, and the same manufacturer of paper (not necessarily the same range)
Look forward to checking out your creations!

Tuesday, 26 October 2010
It's that time of the month already....
it is time for.....

A Sneak Peek....
Monday, 25 October 2010
Tim Holtz Tattered Flowers and Leaves Dies
Thought I would share a pic of the flowers and leaves (Tim Holtz Tattered Flowers and Leaves) we are making at the retreat this weekend.
It doesn't show up, but I have coated the paper with the new glitter modge podge that has just come in. This made the paper very strong but flexible...and glittery.
 If anyone would like me to do a step by step on these please leave me a comment.
Thanks for looking,
Marg.
It doesn't show up, but I have coated the paper with the new glitter modge podge that has just come in. This made the paper very strong but flexible...and glittery.
Thanks for looking,
Marg.
Friday, 22 October 2010
Weekend Challenge - Comic Strip Inspired Layout
Wowsers! Can you believe it is Friday again - ALREADY!!!!
So it is time for me to set this weekend's Challenge.
My challenge to you is to create a layout using this cartoon strip as your inspiration.

Here is my layout:

DOG V MILK CRATE - created by Mish
I have used the fun Jillybean Soup "Cream of Mushroom" Papers and the 3 different coloured alphabets available with the range. Along with BG Milk Chip Alphas & Green Tara Blossoms.
Our JR is very annoying when you sit outside - something to do with my boys teaching her how to play soccer when she was a pup - so now if you go outside, you always end up with her basketball at your feet - even if you are at the back of the house, she will bring it all the way from the front to the back just to get you to kick it to her. The only way to stop her from bring the ball to you is by sticking it under a milk crate - which then just frustrates her for hours until you take it out. But it's the only way you get peace and quiet if you are sitting outside!
Now it is up to you to create your layout and load it into the GALLERY before MIDNIGHT SUNDAY NIGHT to be in the running for the Prize Voucher at the end of the month.
Thursday, 21 October 2010
Thursday is Challenge Day also!
Today's Challenge is a blind scrapping challenge
So you need 1 sheet of cardstock
4 strips 2inches x 12 inches of patterned paper
1 circle - 4 inches in diameter of patterned paper
1 photo 6 x 4 portrait photo (meaning the longest side of the photo is the up and down edge)
3 photos 2 x 3 portrait photo
Embellishments and alphas to make your layout your own
Take the sheet of cardstock
Adhere the first strip of pp 2 inches from the left hand side of your cardstock
Trim some length second strip of pp and adhere to the left hand side of your cardstock, slightly overlapping the first strip of cardstock
Take the 3rd strip of pp and adhere to the bottom of your layout - about 2 inches from the bottom, overlapping the pp that runs vertical
Take the 4th and final strip and trim some length off it and adhere on the bottom of the other horizontally running strip
Take the circle and adhere on the lower left hand corner of your layout, slightly overlapping the strips of pp
Place your 6 x 4 photo on the circle, overlapping so that the top of the photo is on the cardstock
Take your 3 smaller photos and align, so that the centre of the small photo is in line with the centre of you large photo - adhere them in a straight line - from left to right across your layout
Take some alphabets and create your title underneath your photo
Embellish your layout to make it your own.
Load your layout into the GALLERY by the end of October to go in the draw for the prize voucher
Tuesday, 19 October 2010
Tuesday is Challenge Day
And today I challenge you to use the following ingredients on a layout/card/otp
2 complimentary coloured cardstock (use your colour wheel - if you don't have one just google one)
3 scraps of patterned paper - no larger than a 5 x 5 piece (I am sure you have some of those little scraps laying around)
1 full sheet of patterned paper - you don't have to use the whole thing
No more than 6 embellishments
A Monogram Letter
Alphabet Stickers
Here is my example:

Looking forward to seeing what you create!!!! Load your layouts in the GALLERY to be in the draw to win the end of the month prize voucher - or link them in the comments section of this post.
2 complimentary coloured cardstock (use your colour wheel - if you don't have one just google one)
3 scraps of patterned paper - no larger than a 5 x 5 piece (I am sure you have some of those little scraps laying around)
1 full sheet of patterned paper - you don't have to use the whole thing
No more than 6 embellishments
A Monogram Letter
Alphabet Stickers
Here is my example:
U CAN RUN - created by Mish
Complimentary colours - Blue/Grey & Orange
3 scraps of paper - the 3 strips near the photo
1 full piece of PP Basic Grey Ambrosia Range
6 embellishments - Basic Grey Bling Blossom & Green Tara Blossom
Bingo Card
Kaiser Bling Rectangle
German Scrap (from my stash)
Label from my labelmaker
Monogram U - Bella Upstairs and Downstairs Chipboard
Bella 1404pc Alphabet booklet - alpha stickers.
Looking forward to seeing what you create!!!! Load your layouts in the GALLERY to be in the draw to win the end of the month prize voucher - or link them in the comments section of this post.
Friday, 15 October 2010
WEEKEND CHALLENGE 15th Oct - OTP Gift
Hey CPC fans! It's Lee here.
I have a fun weekend challenge for you!
Let's create an item that can be used as gift - it could be a great way to get ready for the silly season ahead with teachers gifts etc.
I did up one of the Bella chipboard mini-albums, with some left over Sassafrass Lass "Indie Girl" paper and die cut stickers from the October kit, and some rad Cosmo Cricket "Ready Set Chip" Alphas, and Making Memories Tiny Type alphas. This will be a gift for my rels as a brag book for the new little man in our lives, my nephew Josh. Check it out HERE

Leonie made this gorgeous basket - it is super cute. Check out the gallery for the details on her creation.

Can't wait to see what you make! Remember, people who play along with our Weekend Challenges and upload your stuff to the Weekend Challenge gallery or link to your blog or image with your creation in the comments section below, will have your name added to the Voucher draw at the end of the month, so you have to be in it to win it!
Have a great weekend,
Lee
I have a fun weekend challenge for you!
Let's create an item that can be used as gift - it could be a great way to get ready for the silly season ahead with teachers gifts etc.
I did up one of the Bella chipboard mini-albums, with some left over Sassafrass Lass "Indie Girl" paper and die cut stickers from the October kit, and some rad Cosmo Cricket "Ready Set Chip" Alphas, and Making Memories Tiny Type alphas. This will be a gift for my rels as a brag book for the new little man in our lives, my nephew Josh. Check it out HERE
Leonie made this gorgeous basket - it is super cute. Check out the gallery for the details on her creation.
Can't wait to see what you make! Remember, people who play along with our Weekend Challenges and upload your stuff to the Weekend Challenge gallery or link to your blog or image with your creation in the comments section below, will have your name added to the Voucher draw at the end of the month, so you have to be in it to win it!
Have a great weekend,
Lee
Wednesday, 13 October 2010
Christmas Card Class - Step by Step
Hi everyone,
Thought I would share a card we are making in the shop next week, using the same method of making a felt flower that we did on the blog recently.
Ok for this card you will need:


Now cut some mirror board to fit the front of your card, leaving an even border of white around the edge.Emboss and stick to the card.

Now cut a strip of white 2" by the length of the card and a strip of red 1 3/4" by the length of the card.
Stick the red on the white and stick down the middle of the card. Cut a large eyelet circle out of red and a circle of white to fit inside the red, stick the white on the red with d/sided tape.


 I hope you have been enjoying my step by step projects, please leave me a note if you want, love to hear your comments.
Until next time, take care - Marg.
Thought I would share a card we are making in the shop next week, using the same method of making a felt flower that we did on the blog recently.
Ok for this card you will need:
- Folded card
- Mirror board
- White and Red card
- Double sided tape and 3d foam.
- Martha Stewart rose leaf punch
- Spellbinder dies - circle and new eyelet circle
- Felt - with matching cotton and a needle
- Brad
- Small flower
- Christmas Greeting
- Christmas embossing folder
- Cuttlebug
Now cut some mirror board to fit the front of your card, leaving an even border of white around the edge.Emboss and stick to the card.
Now cut a strip of white 2" by the length of the card and a strip of red 1 3/4" by the length of the card.
Stick the red on the white and stick down the middle of the card. Cut a large eyelet circle out of red and a circle of white to fit inside the red, stick the white on the red with d/sided tape.
Punch 5 leaves and ink edges with a darker green. Attach the flower to the middle of the white circle with a brad, putting the flower in the centre first. Then glue the leaves in the gaps, taking the tips to the edge of the circle.

All that is left is to 3d the circle on the card and add a Christmas greeting below it.
This is the same card with different colours, please have a go at these and share in the gallery.
Until next time, take care - Marg.
Tuesday, 12 October 2010
Time for a Sketch
Well, it has been a while,
So I thought that it was about time I had a go at creating another sketch, now I no longer have to dream about designing a new kitchen - because the reality is here! YAY!!!!
So here is a sketch!!!
 Will see if I get the chance to scrap a layout today to give an example - seeing I finally have a day off from the renovating!!!
So here is my layout - which is using October Designer Kits and featured in the mid monthly newsletter

Cheers
Mish
So I thought that it was about time I had a go at creating another sketch, now I no longer have to dream about designing a new kitchen - because the reality is here! YAY!!!!
So here is a sketch!!!

So here is my layout - which is using October Designer Kits and featured in the mid monthly newsletter

Cheers
Mish
Saturday, 9 October 2010
Weekend Challenge
Well the weekend came around very fast....where is this year going??
This week I would love everyone to do a wedding or birthday layout as our challenge, also would like to you use.
Cheers, Marg.
This week I would love everyone to do a wedding or birthday layout as our challenge, also would like to you use.
- 1 card stock
- 2 patterned papers
- 3 words in your title
- 4 techniques - eg...sanding, stamping, embossing etc.
- 5 embellishments
Cheers, Marg.
Saturday, 2 October 2010
Weekend Challenge
Your challenge this weekend girls is to make a felt flower and to actually use your felt flower on a layout or on an OTP or a card ... Marg has made life a little easier for all of us ... check out her tutorial on this blog ...
I made a few felt flowers last night and whipped up a layout this morning.

I made a few felt flowers last night and whipped up a layout this morning.

Ta da ... two felt flowers put together from Marg's tutorial - check it out girls ... how easy is that? A little felt, a little ink and voila ... I found a bauble to pop into one of them and then topped the other with a wee Prima flower and I made another one and popped in a purple bling crystal brad ... so that's your weekend challenge this weekend ... to make a felt flower [or two or three or four] and show us how you have used them.
Have fun........Michelle
Embellishment Class No 2 - Paper Pieced Teddy.
This is another of the items we made in our first Embellishment class last week.
They are soo cute, have a go, will look great on a card or layout.
Paper Pieced Teddy.
You will need -
* Stamp and ink (I used a Birch Baby Stamp set and black Stazon ink)
* Selection of PP and card stock. (I used BG Friutcake papers, some brown hand made paper, some other scraps of pp and White card.)
* Punches or Nestabilities ( I used the Nestabilities Ovals and Scalloped ovals)
* Some inks or liquid chalks ( I have used Colorbox liquid chalks and a dauber)
* 3d foam and double sided tape.
* Good sharp Craft knife or precision scissors
* Glue stick, pen or glue pad.

Now stamp your image twice onto white - 1 being the main card that is then cut with Oval Spellbinder.
twice onto brown, once onto the two pp's, and then the feet twice onto another paper.
Cut out each bit.

 Then you just start sticking him back together on your main card, leaving the extra head and feet, these you will add 3d foam dots to before sticking on.


 Now almost done. Stick your brown with d/s tape to your large Scalloped oval, and your teddy to the small oval, then using 3d foam stick the 2 bits together....and this is what you will have.
 Is he cute or what??!! Barbie has already used the one she did at the class on a layout below.

bye for now,
Marg.
They are soo cute, have a go, will look great on a card or layout.
Paper Pieced Teddy.
You will need -
* Stamp and ink (I used a Birch Baby Stamp set and black Stazon ink)
* Selection of PP and card stock. (I used BG Friutcake papers, some brown hand made paper, some other scraps of pp and White card.)
* Punches or Nestabilities ( I used the Nestabilities Ovals and Scalloped ovals)
* Some inks or liquid chalks ( I have used Colorbox liquid chalks and a dauber)
* 3d foam and double sided tape.
* Good sharp Craft knife or precision scissors
* Glue stick, pen or glue pad.
Now stamp your image twice onto white - 1 being the main card that is then cut with Oval Spellbinder.
twice onto brown, once onto the two pp's, and then the feet twice onto another paper.
Cut out each bit.
Now cut your ovals and scalloped ovals using your Spellbinder die, I have used my trusty Cuttlebug...did I tell you that I really love the Cuttlebug...well if not....I love my Cuttlebug.
Would use it almost everyday.
Use your liquid chalks around the all the ovals, then use a dauber to put a soft edge in towards your teddy, doesn't show up very well on this pic, sorry.

Thanks for dropping in,
I would love some feedback as to if anyone would like me to do more of these step by step tutorials, please leave a comment if you would like me to. bye for now,
Marg.
Friday, 1 October 2010
October Designer Kits .....

Sassafrass Lass Indie Girl
This month's kit features:
Sassafrass Lass' "Indie" range
- Free Spirit
- Pocohontas and Me
- Flag Banner Strips
- Journalling Boxes
- Whimsies
- Basic Grey's Sweet Pea "Sprout"
- "Oh Baby"
- Bella "Upstairs" Chipboard Alpha
- Bella "Ruby Rocket" Words
-Bella Kraft Accents
- 7Gypsies Vintage Journal Page
- Prima Roses
- Bazzill Cardstock
*Kraft
*Mulberry
*White

- Bella "Ruby Rocket" Words
- Bella Kraft Accents
- Bella Kraft Mini Alphas
- 7Gypsies Vintage Journal Card
-Sassafrass Lass "Indie Girl"
Whimsies
Journal Tags
Flag Banner Stips
- KAISERcraft Rhinestone Word
- Heidi Swapp Brad
- Autumn Leaves Clear Stamp
- Ribbon
- Bella Kraft Accents
- Bella Kraft Mini Alphas
- 7Gypsies Vintage Journal Card
-Sassafrass Lass "Indie Girl"
Whimsies
Journal Tags
Flag Banner Stips
- KAISERcraft Rhinestone Word
- Heidi Swapp Brad
- Autumn Leaves Clear Stamp
- Ribbon
Subscribe to:
Posts (Atom)